Wednesday 21 December 2011

AI Behaviour Tree

It has taken me a couple of weeks to get the Behaviour Tree processing up and running.  I still don't know how effective my artificial intelligence (AI) will be but the mechanism for controlling it is now in place and appears to work.


I am pleased with the design:
  • Runs in a separate thread (separate hardware thread on the Xbox)
  • Shares processing fairly between all the AI controlled entities (Bots)
  • Unlimited levels of child behaviours
  • Parallel behaviours

It is the ability to add parallel tasks that I needed.  I got stuck at that point with my earlier state machine version.

The problem I had with the state machine was that a Bot may wander about and while wandering needs to be able to look out for enemies in the area.  In addition when the Bot enters combat it needs to be able to shoot at a target while running for cover.  In this Behaviour Tree design the behaviour can replace its own parent behaviour or launch a new behaviour to enter combat. That combat behaviour then launches two more behaviours, one to shoot at a target and the other to decide where to move to.

Each behaviour is a separate class so I have things like, Hide, Chase, Evade, Combat, Find something to do, Wander, etc.  I had to create twelve separate behaviours before I could even test it.  This is because so many of the behaviours are made up of other behaviours and so few actually control the Bot.

To avoid creating garbage** I had to design the structures and classes carefully.  I finished by having only one instance of each behaviour shared by all the Bot classes.  Instead of adding the behaviours as needed and using the individual behaviour classes to store results, the results are passed in to and returned from the behaviour classes.  The results being stored between updates within their respective Bot's class'.

This image shows a simplified version of the design:


I have added a method to show on screen what any individual Bot is thinking.  I have this running in the game and I can see that the Bots respond to changes in the environment by changing their behaviour.


At the moment some of the behaviours themselves are not carrying out the actions that I would like but as each one is now independent and broken down in to smaller and smaller behaviours I can work through them to adjust each in turn to get the results I want.

==

** Garbage is the term used for adding and then freeing up memory on the heap.  This freed up memory needs to be collected for re-use by a framework process that is relatively slow on the Xbox. Just adding to the heap is eventually sufficient to trigger the slow collection process even if there is no memory available to free up.

Sunday 11 December 2011

GameTime in another Thread

I run all the AI in Diabolical: The Shooter in a separate thread.  On the Xbox this is a hardware thread.  While working on the Behaviour Tree that I am currently in the process of implementing I found I needed to keep track of time.

The time is used to avoid tasks taking too long and making the Bot look daft.  It did not take me long to realise that getting the main thread GameTime in to another thread is not that easy.  In fact the following post from the XNA forums convinced me that I should not try: http://xboxforums.create.msdn.com/forums/t/10587.aspx

In the post Shawn Hargreaves suggests using a Stopwatch.  As Shawn wrote a large chunk of the XNA framework I have a lot of respect for his suggestions and taking that advice usually saves me a lot of work.  So without any hesitation that is what I did. 

I need to pass the time round to lots of behaviours.  The Stopwatch is a class so I could pass that round easily.  It's results are TimeSpan's which are structures so not as fast for passing as a parameter.  I would have liked some of the convenience of the GameTime class however it was unclear from the documentation if it included its own timer so I decided to write my own wrapper for a Stopwatch.

As it turned out all I needed was the following:


// Use a stopwatch to keep track of 
// the time for other threads
public class ThreadTimer
{
    private Stopwatch threadTime;

    // Create and start the timer.
    public ThreadTimer()
    {
        threadTime = Stopwatch.StartNew();
    }
    // The time since the timer was started
    public TimeSpan CurrentTime
    {
        get { return threadTime.Elapsed; }
    }
    // Calculate the future time after a number of 
    // seconds has been added to the current time.
    public TimeSpan EndTimeAfter(float howManySeconds)
    {
        return CurrentTime + 
               TimeSpan.FromSeconds(howManySeconds);
    }
}


I start that class whenever the new AI thread starts:


private void ProcessBehaviourUpdatesThread()
{
#if XBOX
    // First move on to the desired 
    // hardware thread
    int[] cpu = new int[1];
    cpu[0] = 5;
    Thread.CurrentThread.SetProcessorAffinity(cpu);
#endif
    // Each thread needs it's own random
    random = new Random();
    // Use the time to prevent run away behaviour
    threadTime = new ThreadTimer();
    // Keep the thread processing requests
    while (!KillThreads)
    {
        UpdateBehaviour();
        // Allow for anything else that runs 
        // on this hardware thread to get a chance.
        Thread.Sleep(
               GameSettings.botLoopSleepMilliSeconds);
    }
    IsBehaviourThreadActive = false;
}


That 'threadTime' is then passed to the Update() method of each behaviour. 

While mentioning threads I also pass the Random class as well.  That is another thing that is awkward with threads.  For some reason each thread must have its own Random.  I pass the reference to that in the Update() as well.


I'm please with how my Behaviour Tree is coming along.  At the moment it is untested but already it is more flexible and neater code than the State Machine I was using before.  The main code is done and now I am adding the individual behaviour classes.  I'll probably go in to more detail when I have it tested.

Monday 21 November 2011

Navigation Mesh Pathfinding

There are two schools of thought with navigation for bots within games.  One is that the level designer or artist should mark the the usable areas and cover used by the computer controlled characters.  The other method is for those items to be calculated by the computer.

As I am both the coder and the level designer one way or another I had to do some coding.  Rather than programme methods in to the editor to let me manually lay out the mesh I decided to get the computer to calculate the navigation details.

A navigation mesh is a connected set of closed shapes representing the area of the map that can be navigated by the non-player characters.  There are loads of articles and presentations on the Internet explaining the advantages of this type of design over others.

I have spent the last month, evenings and weekends, working on my version.  My first attempts were to use edge detection and I came up with a very nice outline of my map but I was unable to come up with a satisfactory solution for turning that outline in to the closed convex shapes needed for pathfinding.

My eventual solution was to fill the map with the largest rectangles I could.  They get smaller as necessary to fill all the areas of the level that a character can move to.


I call the rectangles rooms but as you can see from the picture they are not rooms as we would envisage them.  Just open spaces within the level.  Any edge of a rectangular room that touches another rectangle I call a doorway.  Again not a real doorway but a space that a bot can move between to get from one rectangle to another.

I am pleased with the way this fits round obstacles while still letting bots pass through quite narrow gaps.


This is all calculated by the editor at design time.  The grid size used is 4x wider and 4x taller than the in-game grid.  This gives 16x more precision than the run time terrain grid.  Not all of this information is needed for pathfinding.  Only the room numbers and the doorway locations need to be saved and then loaded and used in-game at run time for pathfinding.


The paths calculate relatively quickly.  With my previous pathfinding solution I used a grid based A-star (A*) method.  On my test map this was slow mainly because the level would have over 16 thousand nodes.  The new solution on my small test area has only 64 nodes and I expect a full map to have less than 200 nodes.  A factor of about 100 smaller.  In addition the new navigation mesh doorways are more accurately positioned than a simple fixed size grid.  The A-star algorithm is nearly identical but is working on a much small sample set and it starts with only open nodes.  On my development PC the path calculation appears instant.


The information I am now storing lets me include ceiling heights and path widths.  The new methods prevent large entities trying to move through gaps that are too small.


The last feature I added was to pre-calculate cover points.  There are two types but I do not differentiate between them at run time.  Cover that can be hidden behind and shot over and cover next to a corner that can be hidden behind.


The small orange squares shown in the pictures indicate where a bot might possibly find cover.  This is not guaranteed cover because the target will be moving and the bots size is unknown at design time.   At run time the artificial intelligence (AI) will try each suggested cover point in order and check if it provides cover for the size of entity trying to hide and if that spot enables the ability to shoot over the cover at the target.  Only a suitable spot will be selected by the AI for the bot.

My next task is to write the AI that will use the paths.  I already have a state machine AI solution but I found it is not flexible enough for my expectations.  I am now looking to write a goal based AI solution.  We'll have to wait and see how I get on with that.

Thursday 20 October 2011

Multiple FBX Animations

Today I used the Windows Phone SDK v7.1 for the first time.  This includes a fix for the FBX importer so that multiple animations can now be imported from one FBX file.

This is great but a friend of mine managed to find a bug with the process already!  I have also carried out some tests.

Whatever the length of the first animation in the FBX file is the length of all animation imported from that FBX file.  I only have access to FBX files exported myself from Blender.

To try to explain a bit better, if your first animation has 30 frames and your second take has 60 frames, the second animation in XNA will only play 30 frames instead of 60!  It is also a problem the other way round.  If the first animation is 240 frames and the you have an animation that should loop at 60 frames unfortunately it will pause after the 60th frame and not loop until it gets to 240 frames!


With that knowledge it is possible to create separate files with all the same length animations in each file, or just export one action per file as I already do.

As far as I can tell the Blender FBX file lists the correct number of frames and times for each action.  I would like to know if this affects other exporters, such as 3DS.  Unless I have a sample FBX file that does work with multiple takes in XNA with the first being a different length to the others then there is little chance of me being able to create a script that works round this peculiarity!

For myself I am already used to exporting individual animations so I will continue to do so. 

== Follow up ==
I posted a question on the XNA forums to see if it is a problem for others:
http://xboxforums.create.msdn.com/forums/p/93794/561812.aspx

I had a very nice reply from one of the XNA developers who confirmed that they see the same problem and it will now be reported as a bug.

I have a project that may help some people.  It includes methods for splitting FBX files and allows loading of one animation at a time for testing:
http://code.google.com/p/3d-model-prep/

I keep my animations separate from the model anyway so they can be shared but if you want to merge them all together the following article explains how:
http://blogs.msdn.com/b/shawnhar/archive/2010/06/18/merging-animation-files.aspx

Thursday 13 October 2011

More On Shadows

I think I might finally have a solution that works for shadows.

I tried ID shadow maps and they worked well and in combination with the baked in ambient occlusion (AO) the scenes looked good...     in most places!

There is always a catch.  Objects that went underground shadowed the ground incorrectly!  As I had slopes it would have been very difficult to avoid some models that had to be partially underground on at least one side.

To cut a lot of time and trial and error out of this story, the solution was a combination of percentage closer filtering (PCF) and ID shadow maps combined.  I tried variance shadow maps (VSM) with ID but the limitations of the surface formats available on the Xbox meant I could not get enough depth precision at the same time as storing the object ID.  I might still be able to do it with VSM by packing the three variables in to the available formats but that is for another day.  PCF with ID only needs two variables so the Vector2 surface format works well for that.


The sampling method first checks the ID and avoids self shadowing models.  Only then does it resort to the common PCF method using 4 samples.  Anything much more than four samples on the Xbox results in a sudden massive halving of the frame rate which I put down to predicated tiling.


The following is the most significant part of the shader.


float PID_Sample(
        float2 vTexCoord, 
        float fLightDepth, 
        float entityID)
{
    float lit = 1.0f;

    float2 fSample = 
        SAMPLE_TEXTURE(ShadowMap, vTexCoord);
    float casterID = fSample.y;
    // The render target is initialised to white 
    // GraphicsDevice.Clear(Color.White)
    if (casterID < 1.0f && 
        casterID != entityID && 
        fLightDepth >= fSample.x)
    {
        lit = 0.0f;
    }
    return lit;
}


float PID_BoxSampleLightFactor(float4 shadowTexCoord)
{
    float fLightDepth = 
        shadowTexCoord.z - ShadowDepthBias;
    float texelStepSize = 1.0f / ShadowSize;
    // Work in floats
    float entityID = IntToFloat(ShadowEntityID);
    // Sample round the position
    float shadow[4];
    shadow[0] = PID_Sample(shadowTexCoord, 
        fLightDepth, entityID);
    shadow[1] = PID_Sample(shadowTexCoord + 
        float2(texelStepSize, 0), 
        fLightDepth, entityID);
    shadow[2] = PID_Sample(shadowTexCoord + 
        float2(0, texelStepSize), 
        fLightDepth, entityID);
    shadow[3] = PID_Sample(shadowTexCoord + 
        float2(texelStepSize, texelStepSize), 
        fLightDepth, entityID);

 float2 lerpFactor = frac(ShadowSize * shadowTexCoord);
 // Linear extrapolate between the samples
 return lerp(lerp(shadow[0], shadow[1], lerpFactor.x),
    lerp(shadow[2], shadow[3], lerpFactor.x),
    lerpFactor.y);
}


The shadows fade out after about 40m from the camera.  I have found that anything less is a bit distracting in game but 40m is hard to see.  Even with a 2048x2048 shadow map the shadows are a tiny bit more pixelated than my ideal but it is the best I can manage at the moment.


The most important thing is that it works on the Xbox 360 and keeps a solid 60 frames per second with room to spare.

I can now move on to other things... again.


Friday 7 October 2011

That Hut Again

I have another screenshot for you showing the same hut that I created a few weeks ago.  The point this time is to demonstrate the improved shading of the texturing.  At least I think it looks better.  Feel free to comment.


I used the ambient occlusion (AO), described a couple of days ago, baked in to the texture of the model. 

Now I have AO pre-calculated I have removed the awkward and artifact prone self shadowing from the models.  For that purpose I am using ID based shadow maps.

There was surprisingly little information easily available on the Internet.  Perhaps I searched for the wrong key words.  Anyway, most of the ID shadow code is based on one of the many other shadow and filter methods I have tried up to now.

The difference being that instead of comparing the stored shadow depth it simply checks if the thing closest to the light is it'self or not using a unique index number for each model.

The tricky bit I found with ID shadow maps was converting a signed integer to a float in Shader Model 3.  In the newer Shader Model 4 there are loads of built in methods to do that and I could have used an unsigned int which would have been even easier.  None of that was available for the Xbox shader though!  I used the following simple code:


// Consistently convert a signed integer32 to a float
// in the range 0.0f to 1.0f
float IntToFloat(int inputID)
{
    // The maximum value for a signed 32 bit integer
    return (float)inputID / 2147483647.0f;
}


Once everything was a float it was easy to compare.

==

Unrelated to any of the above I have just exceeded the free 200M capacity of the Subversion (SVN) hosting service I have been using.  The project including documentation is 128M and the rest must be the change history.  I have become used to using source control and would miss it if it was not there so I have decided to pay for more capacity rather than mess about chopping up the project in to smaller chunks or trying to manage my own server.  I am trying out a couple of the lower cost SVN hosts to decide which I will use going forwards.

Wednesday 5 October 2011

UV Unwrap In Blender

I have just worked out a way to unwrap models in Blender that produces a result that makes it much easier when creating and working with textures outside of Blender.  I thought I'd better write it down before I forget.

The default options on my setup produce some strangely stretched and distorted results and it is difficult to fit them on the rectangular shaped textures.  I have tried all the clever methods on the drop down list of unwrap choices and always end up using the standard unwrap even though I had not been entirely happy with the result.


Now, using the same menu selection, I have at last noticed the tools options panel appear at the bottom of the tool window, usually on the right hand side of a 3D window.  If you have expanded the little plus and if your screen and Blender window are big enough to see the bottom of the main tool list!

"I think this is why Blender has a reputation for having a difficult UI."

The Unwrap window ONLY appears AFTER you have pressed the Unwrap button and goes away again as soon as you move on to another task!

Look out for this small set of options:


The bit that now makes the Unwrap do exactly as I would like, is the method, 'Conformal'

Don't ask me what that means I have no idea.  What it does is to make all the shapes stay as close as possible in proportion to each other and not distorted.  So a square remains a square and not a squashed rhomboid shape that I used to get.  You have to change the default, 'Angle' option to 'Conformal', every time.  I don't know how to default to 'Conformal' yet.


I find this arrangement much easier to work on in GIMP to align the textures to look correct.  I use the Export UV menu item and use the result as a layer in GIMP and just hide it before saving the final texture.

Back to Blender...

As mentioned above, the odd thing about some Blender options is that they don't become visible until after you have performed the action. When you change the option, in the temporarily visible tool window, the result of the action is changed.   In this case you Unwrap the model to a mess and then change the option and it all neatly lines up for you as you watch.

It can only do as good a job as the seams you have marked, so I spend a lot of time in advance ensuring that all sections of the model can be unwrapped to a flat shape without having to stretch too many of the edges..


It's a bit labourious but just select an edge or two or three and press the 'Mark Seam' button.  Change your mind, select the same edge and press, you guessed it, 'Clear Seam'.  You can Unwrap again and again, to try it out.

Anyway, as I started out by saying, I have found a UV Unwrap method I am happy with.

Tuesday 4 October 2011

Ambient Occlusion Baked In

I've had a busy time working on the shadows and failing to make the results of my shaders quite as pretty as I would like and still get them to run on the Xbox.  That has made me realise I am unlikely to get enough spare GPU resources to add Screen Space Ambient Occlusion (SSAO) as a post process to make things look even prettier.

That led me back to some thoughts I had in the back of my mind that I should be baking more in to the textures at design time so I am doing less work at runtime.  I write code so I prefer a technical solution to problems rather than a pure artistic however there comes a time when even I have to admit defeat.


Bake
This is the term used to describe fixing a machine calculated effect in to a static texture. The modeling or graphics programme calculates some pattern which can be changed and tweaked by the artist until they are happy with the result. Once they have the final version it has to be merged in to the product, usually a texture, so that it can be viewed or used outside of the programme that generated it.

It only took me two minutes of searching to find instructions and tutorials for Blender to create the Ambient Occlusion (AO) effect and to bake it in to the UV wrapped texture.

There were loads of links here are just a couple:
http://www.katsbits.com/tutorials/blender/blender-2.5-baking-ambient-occlusion.php

I used some bits of the tutorial to do the following:


The process was very simple:
  • Create the model
  • UV wrap the model and manually position the UV's so they do not overlap.
  • Select the model in Object Mode
  • Find the Bake panel at the end of the Render section (little camera icon)
  • Select Ambient Occlusion... 
  • Tick (check), Normalise and Clear.
  • Press the Bake button.
It might take a minute or two depending on the complexity of the model and how fast your computer is.


The result a model showing just the shaded areas.  Now I need that and the diffuse texture together.


  • Save the new UV texture, which is just the shading.
  • Use that texture as a layer in GIMP or Photoshop.  Set the layer type to Multiply so the white areas use more of the underlying colour and the black areas use less of that colour.  (Initially I was converting the white areas transparent, Color to Alpha in the layer menu and change the white colour to transparent.  That works just as well but had one more step.)


  • Save it as a PNG
  • Reload it in to Blender.


Now I have a textured model with shading.


Just what I was after.

The advantage of using AO is that it is independent of the lighting in a scene.  It is actually completely fake, it is an artistic effect, there is no such thing in the real world.  It makes things look more 3D.

I will be using this on many of the models in the game.

XBox HLSL Peculiarity

While fiddling with my shadow code to try and get more reliable performance on the Xbox I changed my HLSL shader code so I could quickly make changes to a pair of nested loops that calculated the weighted average.

Most of the testing was done on the PC and it all worked fine.  When I tried it on the Xbox the shadows had completely gone!

It took a while to find but it was the simplest code possible that did not work on the Xbox but worked perfectly on the PC.


 float shadowTerm = 0.0f;
 int sampleCount = 0;
 for (float y = 0; y <= sampleRadius; y++)
 {
   for (float x = -sampleRadius; x <= sampleRadius; x++)
   {
     float sample = something();     
     shadowTerm += sample;
     sampleCount++;
   }                      
 }    
 // Average by the number of values
 shadowTerm /= sampleCount;


That code does NOT work on the Xbox.
Note the sampleCount immediately following the shadowTerm in the middle of the loop.
What could be simpler code.

Take it out and replace with a sum at the end after the loop and...
the following code does work on the Xbox!


  float shadowTerm = 0.0f;
  for (float y = 0; y <= sampleRadius; y++)
  {
    for (float x = -sampleRadius; x <= sampleRadius; x++)
    {
      float sample = something(); 
      shadowTerm += sample;
    } 
  } 
  // Average by the number of values
  shadowTerm /= 
        (sampleRadius + 1) * 
        ((sampleRadius *2) + 1);


If anyone has a reason other than the compilers are different, please let me know.

Sunday 2 October 2011

3D Modeling Tools

I've just read a comment on one of my other posts asking about what I think about the free modeling tools available.  The reply to the comment became too long so I decided to reply by way of this post.

Despite how my blog may appear, I'm not as confident about 3D modeling as I sound.  I've just been learning it for nearly two years on and off so have some experience!  Based on my school results some 30 plus years ago, I do have an aptitude for technical drawing.  I think that helps a bit.

The type of models I produce tend to be architectural.  When it comes to more organic shapes I have to get others to do those.

About 2 years ago I tried most of the free modeling tools.  Some were difficult to use, some too simple for game models and for some there were no working FBX or DirectX exporters suitable for XNA.  I ended up with just three that I gave any serious time to.

I had a brief look at the commercial products but the popular ones used throughout the professional games industry have a price tag of about US$ 3,500.  I suspect that a lot of the people using those for Indie games would be the first to complain about their game being pirated!   Some hobby developers can get away with educational licences.   I want to distribute my game for the Xbox which Microsoft have forced to have a price tag.  Therefore any game released for the Xbox is commercial, no matter what the intention or how low the cost is.

That left me with the shareware, open source or free products.  Without much effort it is easy to establish that by far the most fully featured, continuously developed and suitable tool is Blender.  I have never used 3DS or Maya but from what I can tell Blender is as powerful and in some areas probably more feature rich than those paid for products.

Blender is a powerful tool but like nearly all complicated products it requires quite a while to master.  Having tried it and become very lost, especially with a non-Windows style interface, I looked at other products first.

The three tools that I had reduced my list to were, the free Autodesk Mod Tool, Blender and the free version of Google SketchUp.

To quickly dispense with one of those, Mod Tool.  I tried it, found it's pipeline so confusing I could not work out how to export a model and the whole layout just put me off.  I think but didn't give it much of a chance, that it attempts to simplify some of the technical details about 3D modeling but in the process loses the plot!  I have not looked at it since.

The product I do like is Google SketchUp.  I have only used the free version and I have not spent much time using version 8 but I did use version 7 quite a bit.  It is very quick to learn and easy to produce buildings and things.  The interface is very natural to use.  I wish more powerful tools had this simple and well thought out UI.

For XNA there is a snag with the free SketchUp.  It does not come with any suitable exporters!  The official FBX exporter only comes with the paid for Pro version.  However, if you hunt long enough on the Internet you should find some third party FBX exporters that work with the free SketchUp.  Also SketchUp files are just compressed Colada files and Autodesk do a free converter from Colada to FBX.

SketchUp gets tricky when you want to have more controls to optimise the result for use in game.  Controlling the UV map to minimise the number and sizes of textures or reducing the number of vertices is tricky and may not even be possible in SketchUp.  It's at these times that I kept ending up in Blender to finish a model.  Also I have no idea if SketchUp can do boned animations which I need for my game.  Another plus point for Blender.

Once I had decided that I would need Blender, I spent two weeks just learning the very basics.  Remember I was learning both the product and 3D modeling from nearly scratch.  Over the last two years I have watched numerous tutorials on line and have even purchased two Blender training DVD's.  I also laminated the Blender Hot Key chart and have it permanently to hand.

What I now have is a huge respect for 3D artists.  There is no quick fix that us developers would like.  As a developer I think nothing of spending hours on one small method to get it just right.  That time and more goes in to the fine detail of each good model and each texture on those models.  The work on some of the individual models in AAA games must be as much as I have spent modeling... ever.

All modelling tools, except perhaps SketchUp require a lot of practice to be able to work with.  I decided to concentrate on knowing just one rather than a little about all.  I now almost exclusively use Blender.

Blurring Variance Shadow Maps

Before we get too far, let me point out from the start I have not got this working!

This is the original Variance Shadow Map (VSM) article I have been reading:
http://developer.download.nvidia.com/SDK/10/direct3d/Source/VarianceShadowMapping/Doc/VarianceShadowMapping.pdf

This is one of several Gaussian Blurs I have tried:
http://www.dhpoware.com/demos/xnaGaussianBlur.html


The process sounded simple.  Take the RenderTarget for the shadow map.  Apply the blur in a shader and use that blurred shadow map to render the scene.

Well after lots of late night fiddling with samples and blurs, and after solving the errors about Vector2 requiring Point filtering I still get blurred shadows that are too blurred at the wrong edge where it should be solid and still pixelated at the shadow margin where I want it blurred! 

If anyone knows what important information I am missing, please post a comment telling me how.

I have stuck with my edge filtering for now and intend to try ID based shadow maps next.

Saturday 24 September 2011

Revisit Shadows

The inclusion of the new model in my first scene highlighted limitations in my shadow effects.  Shadows from overhangs and concave objects were stretched down vertical faces producing rough unsightly and distracting shadow margins.  Particularly when moving.

Most shadow maps produce waving edges but the trick is to make them so small that they are not noticed during normal game play.  Mine were unfortunately very noticable in some situations!

I have plenty of other things to do and should have left it but I could not and had to make an attempt at fixing it.

My first attempt was to change to using variance shadow maps (VSM) instead of single depth based with percentage closer filtering (PCF).

VSM uses both the depth and the depth squared and some maths to minimise artifacts caused by the depth buffer being of insufficient resolution.  It avoids the need for a shadow depth bias value.  Much to my surprise it was easy to drop in to my most recent shaders.  VSM works very well.  I am unlikely to go back to PCF.

VSM did not solve my problem.  It removed other artifacts and gave me a much crisper edge but that margin was still stretched and unsightly!

As a quick fix, I used the edge tap smoothing code from my PCF methods.  That worked to reduce the sharp edges but the margins were still too big.  The solution, which I could have also done with my PCF code was to increase the number of samples.  I was using 3x3 samples, I tried 5x5 samples.


As you can see from the picture not a bad edge.  I was happy with that.

Unfortunately there was still a problem...   When I tried it on the Xbox, it could not cope!

The frame rate dropped a bit but worse it just stopped texturing some surfaces!  Aaaaah!

I dropped it to 4x4 sampling, that worked on the Xbox but I was not happy with the shadow margin again, too pixelated!  I had and still have loads of time consuming things I could try to impliment but I had another problem to solve which has given me acceptable results.

The concave objects that were causing me problems had light bleeding near all the inner edges.  I wanted to pull the shadow towards the corner to use more of the dark area and less of the light area.  To do this I wanted to offset the area used for the weighting so it was not central but based on the colour away from the light.

Much to my surprise this solved two problems.  My 5x5 samples became 5x3, 25 down to only 15 samples, just about workable on the Xbox.  Plus the light in the corners of concave objects was reduced to a more acceptable level.


I am not claiming that the results are perfect.  I am learning this as I go along, so there is little hope that I will ever get to AAA game levels of detail.  The results are now acceptable to me although the frame rate on the Xbox is still a little poor.  The wavy edges are no longer distracting during normal game play.

The end result is still a bit stretched and the offset sampling results in an uneven blurred edge but this is for a fast moving shooter not an atmospheric spooky adventure.


I have to have two different quality shaders to get an acceptable frame rate.  A lower number of samples on the terrain (3x3) and a higher number of samples on the structures (5x3) to get the better stretched vertical margin.

You have to get pretty close to see all this and if you did that in a game someone would have shot you by now :-)

Now I just need to try blurring the VSM instead...

http://developer.download.nvidia.com/SDK/10/direct3d/Source/VarianceShadowMapping/Doc/VarianceShadowMapping.pdf

Saturday 17 September 2011

And In The Game...

The hut model in the game.

Thursday 15 September 2011

And Textured...

The finished hut.


Just need to make it one mesh to improve performance and export to XNA.

Sunday 11 September 2011

Developer Art

This weekend I've been working on one of the buildings for Diabolical: The Shooter.

It is a building that will be in the first scene.  Archaeologists digging for alien remains were living in the these demountable buildings.  Several of them will form a small encampment.

I did the concept art a week ago.


Yesterday afternoon and this morning I worked on the mesh using Blender.


Next job is to add the texture.  If I decide to do all the models myself, at one a week, it is going to take a very long time to get the game out.  For more generic items I may have to purchase some finished models to speed things up.

Tuesday 16 August 2011

Over The Shoulder Shooter

I overheard a conversation today by an experienced gamer who thought Third Person and Over the Shoulder views were the same.

It is because of that misconception that I mainly refer to my game as a First Person Shooter (FPS).  It should probably be called an Over The Shoulder shooter.  That is visually similar to a Third Person view.  The difference is not in the visuals but in the control systems.

In a Third Person game the character rotates independently from the camera view.  When you move forwards the character moves forwards in whichever direction it is facing.  That means it could walk across the screen or even towards the camera in some games.  Like a radio controlled car coming towards the person controlling it.

I find that control system very difficult and virtually never play games with a Third Person control system.

With an Over the Shoulder game the character is always aligned with the camera.  If you rotate the character right the camera rotates right as well.  When you move forwards it is always away from the camera.

That is exactly the same motion that you get with a First Person game.  The only difference between that and an Over The Shoulder view is instead of only seeing your own arms you also see most of your body.

I like the Over The Shoulder view because you see what your own character looks like.  It encourages people in multiplayer games to customise their characters because they see what others see.  It lets you see some of what you are carrying without the need for an inventory system.

The other nice advantage is that it usually lets you have a wider field of view.  It helps to avoid the blinkered tunnel vision feel that FPS games can have.

I like it which is why I've written my game using XNA with an Over The Shoulder view.


==

Addition added April 2012:

Here is my understanding of the various terms:
- First person shooter (Halo, Call of Duty): No player model in front and the camera turns in direct proportion to the input.
- Third person car or space ship game (Need for Speed, Project Gotham): There is a model in front. The input moves the model and the camera uses spring physics to bring the camera smoothly back behind the model.
- Third person fantasy game or shooter (Fable II): The input moves the model separately to the camera so the model can walk, forwards, sideways or even towards the camera. In that case pushing the camera away. No or limited spring physics to return the camera. This is like a radio controlled car and I personally find these difficult to play.
- Over the shoulder shooter (GRAW, Gears of War): The input moves the camera directly like a first person shooter but moves it in an orbit round the model with the character model rotation catching up with the camera. Play feels like a first person shooter but you can see yourself.
Unfortunately for me most people describe this as a Third Person Shooter because of the view, without taking in to consideration the control system.

Saturday 30 July 2011

Python Scripting Distraction

Early on this week I received an e-mail from one of the lead developers for Blender asking me to test the latest pre-release Official FBX exporter with XNA.  He had done some work recently using bits of my XNA specific exporter and wanted to know if the official one was now compatible with XNA.

It was not compatible but I had always intended to merge the two in to one unified exporter so I spent the week doing that.

If you are interested all the source code and lots of notes are available by following these two links:

Its done now and the patch has been accepted.  The next release of Blender (2.59) will only need one FBX exporter and XNA will be supported by that official Blender FBX exporter.

It is not quite as user friendly as my current scripts because there are several tick boxes to select to output in the correct format for XNA. 


There is a convenient 'XNA Strict Options' tick box which forces the options to be compatible with XNA.  It is not required but is handy.

If you select the options manually the following are required:
  • Set the scale to 1.0 (which is is by default.)
  • Use the 'Rotate Animation Fix' (essential otherwise animations are a mess!)
  • Turn off, Empty, Camera and Lamp (makes the file size smaller)
  • Turn off smoothing (might not be necessary but I have not tested that yet.)
  • Do not include edges (makes the file smaller and can avoid some import errors)
  • Turn off optimized keyframes (not essential but might remove a duplicate keyframe that was added deliberately!)
  • Do not include default take (can be tricky to merge animations if they are all named 'Default_Take'!)
  • Select the 'Strip Path' mode so the uv textures use the same folder as the FBX file. (easier to manage the files.)
  • Enable Armature included as bone.  (This is the most important option to select.)

Further instructions are on the Blender Wiki:
http://wiki.blender.org/index.php/Extensions:2.5/Py/Scripts/Import-Export/Autodesk_FBX
I'm now going back to my .NET C# code.  So after spending days working in Python and remembering not to end each line with a semi-colon, I now have to remember to put the semi-colon in!

I much prefer C# with the structured code, type explicit variables (I avoid 'var' in .NET) and most importantly Visual Studio's auto complete and syntax suggestions all built in.  Happy coding.

Thursday 28 July 2011

What Can My Game Already Do

An article by Nick Gravelyn over on his blog inspired me to think about what I have done.  Theirs shows a screen shot of what a team of three achieved on their game engine in 6 months.

I've been working on mine for over two years on my own and I'm pleased to say my game can already do a lot, in fact code wise there can't be much more to add.  I hope!

This list of features is a reminder to me of what I have achieved:
  • Walk round a 3D world
  • - Jump
  • - Spectate
  • First person controls
  • Over the shoulder view of yourself (more fiddly than it sounds)
  • Animated
  • - Blend animations
  • - Merge in arm movement to follow which way the player is looking
  • - Hold attachments that move with whatever they are attached to
  • - Shared animation files (and a way to get them in to the pipeline.)
  • Collide with characters and structures
  • Terrain and game editor
  • - Change heights
  • - Change textures
  • Add and remove:
  • - models
  • - triggers
  • - particle effects
  • - goals
  • - trigger goal success
  • - trigger add a new goal
  • - trigger spawn player
  • - trigger spawn non-players
  • - trigger particle effects
  • - Waypoints for AI pathfinding
  • - Spawnpoints
  • Lighting
  • Shadows (not a trivial task, many many months spent on this)
  • Full menu system
  • - Select which map to play
  • - Customise the player character with hats etc.
  • - Load and save character choices
  • - Change music and effect volumes
  • - In game pause menu, resume or exit
  • - Display goals outstanding and completed
  • Select weapons
  • Shoot weapons
  • Bullet trails
  • Bullet impact decals (instanced)
  • Bullet impact effect, debris and smoke
  • Muzzle flash
  • Most things have sound effects
  • Drop weapons
  • Pickup weapons
  • Pickup ammunition
  • Head Up Display (HUD)
  • - Weapon sights
  • - Sniper sights
  • - Zoom in
  • - Display ammo as used
  • - Compass
  • - Radar showing friend and enemy positions if close
  • Non-Player AI
  • - Pathfinding
  • - Select a target if in range
  • - Follow a player (target)
  • and I'm sure there's more...

All the in game stuff runs on the Xbox with a development version running on the PC as well.

In addition to all that I had to write a Python script for Blender to be able to export models from Blender to XNA and as a short distraction I am currently trying to unify that with the built in FBX exported in Blender so that in future one exporter works with everything!

I'm still a long way from finishing the game though.  That is because most of the above use placeholder graphics and so I am now working to create the finished 3D models to go in the game.  Then I will post a video to really show off :-)

I'd like to thank all those people on various forums that have helped along the way.

Sunday 10 July 2011

Before Animating With Blender

Before you can create animations with Blender you must setup your model the right way.  There are plenty of tutorials on the Internet that will explain this as part of 'how to animate with Blender' but it is easy to miss these important steps.  This is a common reason why people have trouble getting animations to export properly for use in XNA.

The short summary is:
  • Create your model mesh object
  • Add an armature (skeleton)
  • Tell Blender that you want to use that armature
  • Make that armature the parent for each mesh that you want to animate.
  • Assign bone weights to the mesh by weight painting or adding bone vertex groups.
  • Create animations

The initial steps must all be done BEFORE you start creating the animations otherwise you might have problems exporting those animations.  The animations still work in Blender but it may be impossible to export them and you will have to recreate the animations!

Armature

An armature is the skeleton used to pose the model.  I won't go in to detail here about that as this article is about the prerequisites of animations not the animations themselves.

Create the skeleton by adding bones.


Edit: 2 Sept 2015
I came across a very interesting auto-rigger called Rigify.  Worth a look, see the following tutorials:
http://blog.digitaltutors.com/rigging-minutes-blenders-rigify-addon/
http://cgi.tutsplus.com/tutorials/create-an-animation-walk-cycle-in-blender-using-rigify--cg-17812
Note that you need to enable IK (Inverse Kinematics) on both the arms and the legs before the various controls act as you might expect.

Naming Objects

When you name any object especially bones it is worth avoiding the decimal point '.' (period, dot or full stop.)

Blender is happy with a full stop but the FBX exporter will rename it to an underscore '_'.  For example, 'Arm.R' becomes 'Arm_R' in the FBX file.


More Than One Way

This is where it starts to get complicated because there are multiple ways to do the same thing.   I will explain, what I call, the manual process first and then mention the shortcut method at the end.

Modifier


Blender needs to know which armature is used with which object.  Simply select the object mesh you want to animate and add an armature modifier with the desired armature.

This is done in Object mode.  You do NOT need to apply the modifier.  It is just used like a note to Blender so it knows what links to what.

It is common to name the Armature 'Armature' and that can be a bit confusing because that is also the name of the modifier to add.  I tend to rename my armatures but as most new users leave the name as 'Armature' I have done that for this screenshot.


The modifier panel is on the right and the name of the skeleton is shown in the 'Object:' box.  In this case it is called 'Armature' and the mesh to which it is being added is called 'Cube'.

Parent

For animations to export correctly it is also necessary for the armature to be set as the parent for any object mesh that you want to animate. 


Initially the mesh will not have a parent.


Again, in object mode with the object mesh selected.  Go to the Relations panel and change the parent to the name of the armature you want to use.


Same example as above, the object is called 'Cube' and the armature is called 'Armature'.


Weight Paint

When you animate a model with bones you need some way to tell the model which vertices to deform depending on which bones you move.    That is called assigning bone weights.  The techniques for doing that are way beyond this summary post.  There are some links to articles about how to assign weights on my tutorials page:
http://blog.diabolicalgame.co.uk/p/tutorials.html


I find I keep adjusting the bone weights, even after creating the animations, to improve the results.  For complex models I find that manually assigning the vertices to vertex groups is the more reliable method rather than using the pretty paint brush style Weight Paint method.


Shortcut Method

The above methods of 'Add the modifier', 'Parent the armature' and Weight paint' can be done in one go using the Parent function. 

In Object Mode, select the Object you want to animate, shift-select the armature and press Ctrl-P to parent the Armature to the Object.  Select one of the weight paint methods from the list that is displayed and job done.

I find this useful for getting started or for very simple models but invariably I have to adjust the weight painting.

Whatever method you use you can go on to create animations.


Create Animations

With the armature selected you can change to pose mode and create animations.  These must be saved as actions using keyframes.   Press 'I' and from the popup menu select 'LocRotScale' to save each keyframe.  

Use the ActionEditor view to see and edit a list of the keyframes saved. 


The Action Editor is often hidden because it is on a separate menu on a toolbar.  Change the option to Action Editor to see the list and change animations.


With the above settings done first it should be possible to export the animations for use in XNA. 


Export

I have a another post about that:
http://blog.diabolicalgame.co.uk/2011/07/exporting-animated-models-from-blender.html

Multiple animations in one FBX file is possible with Windows Phone SDK v7.1 but there might be a problem:
http://blog.diabolicalgame.co.uk/2011/10/multiple-fbx-animations.html

And the Blender Wiki instructions:
http://wiki.blender.org/index.php/Extensions:2.5/Py/Scripts/Import-Export/Autodesk_FBX


==


Discussion thread on the XNA forums: http://forums.create.msdn.com/forums/p/68149/521975.aspx#521975


==

I'd like to thank Ernest Poletaev for pointing out that the mesh had to be parented to the armature and reminding me to include weight painting in the list.

Thanks to Gary Haussmann for pointing out that decimal points will be replaced by the exporter.

Wednesday 6 July 2011

Exporting Animated Models From Blender To XNA

If you want to develop a 3D game you will probably spend as much time creating the content as writing code. I am not an artist but I have found that Blender is a fully featured 3D editor that with a few weeks practice I was able to create models that I could use with XNA. The pipeline to get animated models from Blender to XNA needs to be followed closely but once understood is as easy as any other tool.

XNA and Blender are still being developed, improved and updated. Changes to both platforms have affected the methods required to have a successful pipeline. Follow the specific instructions for the XNA and Blender versions you are using.

Instructions for creating models that can be exported to XNA

Getting models to look right when they are imported in to XNA can cause a lot of confusion.  Like many things it is not difficult when you know how. 

There are several techniques that look fine from within Blender but which either have to be avoided or adhered to if you want to use that model in XNA.
This is a summary of the most common things that catch people out:
  • All the model objects (meshes) and the armature must be centred at the same location, ideally zero (X = 0.0, Y = 0.0, Z = 0.0 in the Object properties.) Set the locations to zero in Object mode and make all changes in EDIT mode.
  • All the model objects must have a scale of 1.0 (one.) Set all the scales to 1.0 in Object mode then do all changes in EDIT mode.
  • The model objects must not use rotation. Set all the rotations to 0.0 in Object mode then do all changes in EDIT mode.
  • Every vertex must be weight painted or added manually to a bone vertex group. Any loan vertex will cause an error when importing in to XNA. To check you have bone weights for all vertices pull the model about in POSE mode. Any un-weighted points will be left behind when posing the armature.
  • The XNA model class only supports UV wrapped textures. Blender's shading only work in Blender not in XNA. 
  • The FBX importer only support keyframe animations from Blender Actions and will not work with Blender's curves.
  • In XNA set the 'Content Processor' for the FBX model to 'SkinnedModelProcessor' or whatever your processor name is - this is the most common oversight.

To explain in more detail:

(Update Dec.2012 for Blender 2.6) The quick way to do this without changing the appearance of the model is to use the Apply menu in Object mode.  Select the object (mesh) and use CTRL+A to bring up a small menu and then L to move the location of the origin to zero, R to fix the rotation to where it is and S to fix the scale.

As a rule of thumb, once you have set all the Blender objects properties to a location and rotation of zero and a scale of one all the modelling will be done in Blender's EDIT mode.


Blender is easiest to use if models are created with up in the Z direction. XNA's default is that models use Y as the up direction! From trial and error I have found it is easier to rotate the model when imported in to XNA rather than trying to work in Blender the wrong way up! Animations do not rotate very well in Blender, usually resulting in a mess!   Using the rotation options in Blender's FBX exporter always results in a mess!


I have an XNA project with a content pipeline animation processor that includes a method for rotating 3D models while they are loaded including rotating their animations. Its only a few lines of code inserted at the correct point. 


public static void RotateAll(NodeContent node, 
                             float degX, 
                             float degY, 
                             float degZ)
{
  Matrix rotate = Matrix.Identity *
    Matrix.CreateRotationX(MathHelper.ToRadians(degX)) *
    Matrix.CreateRotationY(MathHelper.ToRadians(degY)) *
    Matrix.CreateRotationZ(MathHelper.ToRadians(degZ));
  MeshHelper.TransformScene(node, rotate);
}
  

Use a rotation of X = 90, Y = 0, Z = 180 to rotate from Blender to XNA during the pipeline processing. Download that project source code using a Subversion client to see how its done: http://code.google.com/p/3d-model-prep/

You can download just the XNA Skinned Model Processor with corrected rotation from:
http://code.google.com/p/3d-model-prep/downloads/list


There is one last thing to watch out for.  Poorly finished models with orphan vertices or edges are likely to cause errors or warnings during the import in to XNA.  This is a common result of preparing a model to be game ready especially when reducing the numbers of faces a model uses to improve performance.  I have a separate post on finding missing edges: http://blog.diabolicalgame.co.uk/2011/07/vertex-information-missing.html
This is not so important with the latest Blender FBX exporter because I have made that ignore lone vertices.


Setting up the animations


There are some prerequisites for creating animations and I have put those in another post:
http://blog.diabolicalgame.co.uk/2011/07/before-animating-with-blender.html


Exporting FBX Files

In versions of Blender prior to 2.59 the standard FBX export script that ships with Blender is NOT suitable for XNA. If you want to use XNA 4 please upgrade to at least 2.6x of Blender.  There are some older instructions at the end if you are still using XNA 3.

From Blender 2.59 onwards the official FBX exporter supports XNA.

Blender 2.59 and 2.6+ to XNA 4.0

To work with XNA you must be using a version of Blender greater than 2.59.  At the time of updating this page 2.60a is the latest stable version of Blender. 

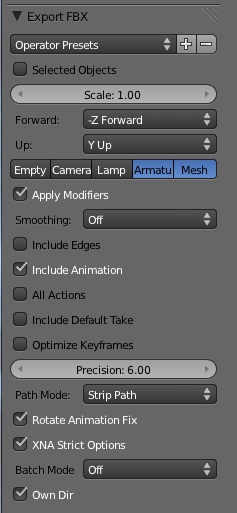
The official Autodesk FBX exporter included with that version supports XNA.  The export script has general documentation on the Blender Wiki:

The above image shows the typical setting for use with XNA.  It is necessary to change the default settings when working with animations.  The default works for non-animated models but the rotation breaks animations.  The default options also include more information in the file than XNA can use.

As a quick way to export XNA compatible files there is a tick box that sets all the required options:


It is mainly the 'XNA Rotate Animation Hack' and the Path mode: 'Strip Path' that are needed.  This stops any rotation of the model and requires that all texture files are stored in the same folder as the FBX file.

The 'XNA Strict Options' is just a quick way to set the essential XNA options.  One tick and all the settings work.  You can still adjust some of the settings but it prevents you accidentally changing a necessary option.

Individual Animations
The Autodesk FBX importer shipped with XNA 4.0 introduced the limitation that only one animation can be loaded from an FBX file. The updated version with the Windows Phone 7.1 SDK tried to fix this but included a bug so the number of frames in all animations was the same as the first take!  

The Blender script not only has an option to output in a compatible format for XNA but also has an option to output 'All Actions' or if that is not selected, to output just the currently selected animation. 


Just having one animation in each FBX file is the solution that works best with the current (November 2011) version of XNA.


In POSE mode use the 'Action Editor' to select the animation to export.


Then export and make sure the option for 'All Actions' is off.


==


Blender 2.49b to XNA 3.1 or older [Archive]

At the time of writing the last version of the old series of Blender is 2.49b.  In order to use older versions of XNA you will probably need to use the older series of Blender but make sure it is version 2.49b. Earlier versions have issues. Specifically 2.49a has a fault preventing scripts from running! (Nov.2010)
Essential script
As mentioned above the standard FBX exporter will not work with XNA it is essential to use the following script or a variant of it:
http://wiki.blender.org/index.php/Extensions:2.4/Py/Scripts/Export/FBX-XNA
This script is NOT shipped with Blender and must be downloaded and installed.

Download an XNA 3.1 compatible exporter from:
http://www.discoverthat.co.uk/games/blenderscripts/export_fbx_for_xna_v122a.py
or
http://www.triplebgames.com/export_fbx__for_xna.py

Copy the script in to the Blender script folder.  In Windows Blender 2.49b scripts are stored in:
%USERPROFILE%\AppData\[Roaming]\Blender Foundation\Blender\.blender\scripts

Installation of Blender 2.4 Python scripts
The scripting language used by Blender is Python. In the older versions of Blender up to and including 2.49b you'll need to download and install the full version of the Python scripting language 'Python' to use these scripts. You must install the matching version for the version of Blender you have. It tells you in the console Window when you start Blender. For example, Blender 2.48 required version 2.5 of Python (the sub version is not critical so version 2.5.2 and version 2.5.4 both work but version 2.6 would not.) Get from Python.org.

==


Blender 2.56 to 2.58 [Archive]

These early 2.5x versions shipped with a separate compatible exporter.  I strongly recommend using the newer 2.59 version but the instructions for the older version are still on the Blender Wiki: