Showing posts with label Blender. Show all posts

Wednesday, 3 June 2015

Blender Quick Reference

I have used Blender a lot for 3D models for games but my use has long periods away doing coding or other projects.

That means whenever I return to 3D modelling I have to remember how to use Blender again. Typically Blender has progressed a version or two as it is very actively being developed. It always takes me a while to get back up to speed.

I hunted round for quick start guides and keyboard shortcuts but none quite had what I needed.

What I wanted was the common features used to make most models to get me up to speed as quickly as possible. I don't need every feature because I can look up the rarely used ones as needed. Therefore, in my usual way, I have created a desktop quick reference guide that has the features I need to remember each time.


This will continue to be a work in progress. I will add more reminders as and when I know what I need to use.

Downloads

I've made a couple of versions available for download:

PDF to print or view
Source PowerPoint to edit to make your own changes

3D Printing

If you are interested in 3D printing see my other blog.

==

Last Updated - 3 March 2016

Cross post on my other blog

Blender Set Origin Script

I have not done much work on my game recently but to do so I need to get round to creating the levels and I'm back to using Blender again.

When I started to tidy up one of my models I came across an odd feature in Blender. You can only set the origin on the active object.

My main reason for setting an origin is to get all of the origins of all of the objects in a scene at the zero point. I find it easier to import in to other programmes and line them up if they all have the same centre.


Using the built in button, it is frustrating having to select one object at a time to set all the origins. I decided to create a script to do this for me.

Not as easy as I expected because even in code the set origin only works on the active object.


I just typed the lines in to the console to run it. After the last line press return one extra time to run it.


for item in bpy.context.scene.objects: 
 if item.type == 'MESH': 
  item.select = True 
  bpy.context.scene.objects.active = item 
  bpy.ops.object.origin_set(type='ORIGIN_CURSOR') 
  item.select = False


The above worked in version 2.74 of Blender. It goes through ALL objects in the scene which is what I wanted.


for item in bpy.context.selected_objects:
 if item.type == 'MESH': 
  bpy.context.scene.objects.active = item 
  bpy.ops.object.origin_set(type='ORIGIN_CURSOR') 


In theory the above should work for the currently selected objects but I have not tested that script.


I came across another oversight when trying to copy that code to save it. To get the Windows Ctrl-C (copy) and Ctrl-V (paste) to work in the console window you first have to click on the console menu item at least once. After that Ctrl-C and Ctrl-V work as expected.

Monday, 12 May 2014

Blender to Mixamo to Blender to Unity

As with all 3D modelling one of the biggest problems is transferring models between applications and still retain all the details.

The following is what works for me to get a mesh modeled in Blender 2.70a in to Mixamo to create the rig and then back in to Blender and on in to Unity 4.3 still in a state to animate.

You may not need to get your model back in to Blender but I need to add some simple animations not available from Mixamo yet.

Blender to Mixamo

Export from Blender using the FBX exporter that ships with Blender 2.70a.


You only need the mesh but the settings matter little.  Mixamo appears to sort out most things.  I used the defaults of -Z Forward and +Y Up.  I do change the Path Mode to 'Strip Path' so the FBX expects the texture file in the same folder as the FBX file.

Compress the FBX file and the texture file in to a zip file and upload just that Zip file in to the Rig upload of Mixamo.


It took me several variations of file types before I worked out the above that worked.  Even the zip file was a problem.  For some reason a zip file created with 7zip did not work but a zip created with WinRar did.

Once in Mixamo the Auto-Rigging worked very well.  Mixamo does a much better job of weight painting than I can manage.

The next trouble was exporting in a format that I could read back in to Blender.

Mixamo To Blender

I found the standard Collada worked with Blender 2.70a, not the version for use with the older version of Blender.


I added the T-pose animation and downloaded it as a zipped Collada file.

I then imported that in to Blender using the Collada (Default) importer shipped with version 2.70a of Blender.


I never understand why most importers change the scale to 0.01.

I simply change the scale for all three axes back to 1.0 and the model and the armature are as I expect.


I downloaded a version with an Idle animation and that worked as well.

Blender to Unity

Blender to Unity poses few problems.  Export to FBX and drag in to Unity.


Again I use the standard settings in Blender, I only include the Armature and Mesh and change the Path Mode to 'Strip Path'.

In Unity, drag the FBX file exported from Blender in to a folder in Unity.


The model imports face down but the armature and animation will make the model face the correct way up without having to rotate the imported mesh.


Like other importers Unity also imports at a scale of 0.01 so it needs to be changed to a scale of 1.0.


If necessary drag the texture in and create a material using that then drag the material in to the mesh renderer for the model.


Prepare to Animate

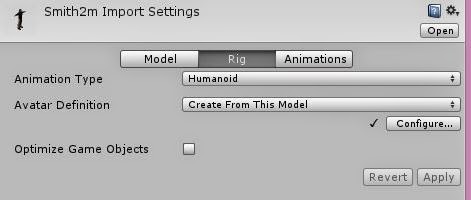
To use any of the animations it will be necessary to configure the Avatar Rig in Unity.


Select the model and press the Rig button.

Change the animation type to Humanoid and press Apply.


The chances are it will work it all out itself but if necessary you can press the configure button.


At this point you should be able to use Mecanim animations on the imported model.  Job done.

Friday, 9 May 2014

Head Texture UV Unwrap

I've been working on the controller and animations and this has led me back to character creation.

I have tried creating my own animations and although acceptable they are not as good as those I can purchase for a modest fee for use with the Unity3D Mecanim system.

In the process of trying out the purchased and a few free bundled animations with my own models I have found some shortcomings with my skinning.  To fix that I have tried Mixamo.  It did a fantastic job of adding a rig and skinning my character.

The test animations also showed where my mesh needed improvement.  Before I create a final skinned mesh using Mixamo I decided I should fix the mesh and that led me eventually to recreating the UV map for the characters head.

Texturing a Head

I have never textured a human head before so to remind me of the technique I used I decided to put it down in this blog.

There are loads of tutorials out there for UV mapping and texturing but the two I found most useful are:
For UV unwrapping: http://bgdm.katorlegaz.com/lscm_tute/lscm_tute.htm
For creating the texture for the head: http://www.3dm3.com/tutorials/maya/texturing/
This one also has a fully body tutorial but was also helpful: http://cgi.tutsplus.com/articles/game-character-creation-series-kila-chapter-3-uv-mapping--cg-26754

I am not going to go in to detail because those tutorials do that.  I am just going to mention the bits I wanted answers to.  The only thing to mention about the tutorials above is that the version of Blender mentioned is an older version. For me the standard Unwrap method created the head UV in one go without any adjustment needed.


Where to create seams?
I decided:
- From just above the hairline back over the head to the back of the neck.
- From under the chin down the centre of the neck at the front
- Across the mouth
- The eyes should be separate and therefore already a hollow cutout

I tried a horizontal cut on the forehead but I found this made it difficult to add hair without a visible line.


Do I separate the ears?
I had seen some examples with the ears being removed and dealt with separately.  I tried that and found the joint was visible.  For me it works best if I keep the ears attached.

Can I use a downloaded head texture created for another model?
No.  I tried adjusting the UV to fit a texture and it did not work.  It was stretched and all wrong in places.  What worked for me was to create the texture to fit the UV map as generated by Blender.  The generated UV has done the maths to minimise stretching.

Basic Technique

Start by exporting the UV map from Blender.  You won't get very far unless you know what you are trying to line the texture up with.  The exported UV image gives you a semi-transparent texture with lines on to use as a layer in your photo editor.


Creating the finished texture is also all about layers.

I started with a background of skin colour.  This was created using photo of a face.  Using the clone tool in Gimp I extended the flesh in all directions until I had a rectangle of flesh.  The important bit is that it retained tonal variation, so it still looked like skin.

The result was still very rough with duplicated wrinkles and blemishes.  I used various blurs and finished with a giant size smudge brush with an opacity of about 60% to end up with an even result.


That skin is the base layer over which everything else is added.

The next layer I created was for the eyes and nose taken from a different photo of a face.  I feathered the edge by using a large erase tool with a faded edge.  It was deliberately a freehand rough cutout so the blend was more natural.  I kept the eye brows as well.

I repeatedly scaled the layer until the eyes lined up with the UV map.  I then scaled vertically to get the nose the right length.

I used small clone and smudge brushes with blurred edges to make the area round the eyes redder and remove any overlap of the eye in the photo with the UV map.  I then filled in the eyes with the same colour and smoothed the result using the smudge brush.

I smudged out the nostrils from the texture because my model has geometry to form those and it looks odd if the texture does not align with the geometry of the nostrils.

I added a layer for the mouth and adjusted the scale to fit the UV map.

The same with the layer for the ears.


For all the added layers above the skin I set the opacity to 50% so they all blended nicely.


At this point I decided to try it on the model and I am pleased with the results.


I added blemishes and the hair the same way using additional layers.


In my opinion hair looks best as a separate mesh made of strips so the hair in this texture is just a placeholder.

Now that is done I can add the rig and skinning information using Mixamo.


Tuesday, 25 December 2012

Sci-Fi Alien Weapons

As usual with modelling it has taken me a about three weekends to create one model.

I drew the concept on the 10th of December and put the final touches to the finished weapon and added it to the game on Christmas Eve.


It's inspired by, in fact deliberately similar to, the alien style weapons pack I purchased from Garage Games


That set only includes 3 models and I needed an additional larger support weapon for the aliens.


I am getting the hang of 3D modelling and the basic untextured model only took a day.  What takes all the time is the UV unwrapping and then the texturing.

I always start by creating the Ambient Occlusion layer for my texture.


It does not help that I have to do some bits twice because I forget to set some parts of the model as smooth before creating the Ambient Occlusion (AO).


Without using the smooth option on parts of the model that are curved, the AO shading is banded instead of continuous.


I always like the model with the AO texture.  Shame I can't leave it that way.  I have seen a game where that was the style of the game.  It looked very good but not what I want for Diabolical: The Shooter.

If my artistic skills were better I would be able to create the texture quicker.  I have to put most of it togther from parts.  More like contruction than drawing.  I go through each part, as split by the UV unwrapping, and add details as separate components and blended in to the base colour.  Layer after layer after layer.


I am starting to learn some of the techniques but it takes me time.

For some reason it ended up grey but for this model I wanted it a more silver colour to match the others.  I used a bit of brightness but mainly I adjusted the gamma correction curve to get something more silver.


The in game lighting adds a bit more shine to the surfaces.


Merry Christmas to all.  25 Dec. 2012.

Thursday, 20 December 2012

Winform Map Editor

Last night I finished my side project of migrating the map editor from being a game screen to being a normal windows application (Winform.)  I've been doing this when I needed a break from 3D modelling. 


At the moment all I have attempted to do is move all the features I had before in to a separate project.  I did find a few minor bug fixes but it is basically the same.

The only major change was to the controls for moving about the map.  It now works more like a 3D modelling programme, in fact the rotate, zoom and move are very similar to Blender.  I have however retained first person keyboard controls for fine adjustments.

I am doing most of the modelling in Blender so the new controls are much more familiar when I bring the models in to the editor.

I have left space to the side and bottom of the main view window to put properties.  I have not coded anything to go there yet but in time I will add something useful.

The editor is still linked to the main game.  It shares some of the rendering code and all of the map loading code.  I compile the editor project in the same solution as the main game.  This means that the map files will always remain compatible.

I find it works well.  The only peculiarity I had was that the game view control from the Microsoft sample is external.  Exceptions thrown in the game view crash the control but the rest of the Winform app continues without error.  The view window goes white with a red cross in it!

I fixed that with a simple try and catch wrapped round my update and draw code:


/// 
/// Redraws the control in response 
/// to a WinForms paint message.
/// 
protected override void OnPaint(PaintEventArgs e)
{
    try
    {
        string beginDrawError = BeginDraw();

        if (string.IsNullOrEmpty(beginDrawError))
        {
            // Slow the game down to no more 
            // than 60 fps (16.667ms per frame)
            if (gameTime.ElapsedUpdateTime > 
                TimeSpan.FromMilliseconds(16))
            {
                // My own version of GameTime
                // based on a stopwatch.
                gameTime.Update();
                // Simulate the update loop in 
                // an XNA game.
                Update(gameTime);
                // Draw the control using the 
                // GraphicsDevice.
                Draw(gameTime);
                EndDraw();
            }
        }
        else
        {
            // If BeginDraw failed, show an error 
            // message using System.Drawing.
            PaintUsingSystemDrawing(e.Graphics, 
                                    beginDrawError);
        }
    }
    catch (Exception ex)
    {
        // Exceptions within external applications do 
        // not automatically break the parent form.
        // These lines trap the exception, display the 
        // error and break the parent code for debugging.
        System.Diagnostics.Debug.WriteLine(
            "Exception in Update or Draw: " + 
            ex.Message + " in " + ex.Source);
        System.Diagnostics.Debug.WriteLine(
            "Stack trace: " + ex.StackTrace);
        throw new Exception(ex.Message);
    }
}

The whole app now crashes and the exception is displayed to help debugging.

In addition to being able to position, models, triggers, waypoints and generate the navigation mesh used by Bots, I have loads of helper overlays within the editor.  Too many to list:


I nearly forgot.  There was a point to moving the editor out of the main game. 

Every time I tried to change the game I had to keep it compatible with the editor.  There was often lots of extra code just so the game remained fast and the editor had features.

When I started looking at adding in the networking code it just got too complicated to do what I wanted and retain compatibility.  That's what kicked off this little side project.

It's how I should have done it in the first place.

Sunday, 16 September 2012

Bake A Pose In Blender

Following on from my post the other day about importing in to Blender.  I need to change the bind pose to the T form so that all my animations start off from the same pose.


Repositioning the model can be done by posing the model using the armature.  The trouble is that the moment you try to edit the mesh it always reverts to the original rest pose position. 


I want to set the vertices in the posed position and for them to stay there.

I am sure I used to be able to move the model in pose mode and then apply that pose as the rest pose.  I tried that and tried searching Google but nothing worked.

I eventually found what I needed and it is very simple. 

Before doing anything save a separate copy of the file because you may want to go back and change your mind about the pose but the following removes the armature from the mesh.

Fixing the Pose

Pose the model in whatever form needed, swap back to Object mode and select the model not the armature and then simply press the button to apply the armature modifier.


Job done, the Object is now separated from the armature and remains in the pose it was last in when you edit it.


It is not always ideal to remove the armature but at least I can re-add an armature if necessary.

It's taken me most of the afternoon to work out how to do this but now I have run out of time.  Sunday dinner is ready and I am unlikely to have time to edit the pose in to the T-pose until next weekend!


Thursday, 13 September 2012

Importing In To Blender

I have purchased a few models to help make the levels a bit more interesting.  It is supposed to save me time so I don't have to create them all myself but it has taken me a while to find a good method to get the models in to Blender.

The sets of models come with loads of different file types for each model.  The most useful being Autodesk FBX, Collada DAE, Wavefront OBJ and Lightwave LWO.  The trouble is none of them are fully compatible with the Blender importers for them! 


Some of them just cause errors and will not import, some import without their textures but by far the biggest problem is that the models import as one object with multiple textures.  The latter looks OK but the moment you edit them the textures get combined on to just one of the supplied textures spoiling the look of the model!

I have a solution for most of the issues with static models but I have not got anything reliable for the armature and animations in animated models.

Getting the model in to Blender

I found the best solution for static, non-animated, models was to use the Autodesk FBX converter (v2013.2).  Take the FBX file as the source and output to an OBJ file.  The result is compatible with the OBJ importer in Blender (2.63a).


It's very easy to use, just open the source FBX shown on the left, select OBJ on the right hand side and press convert. 

Animated Models

As mentioned above I do not have a reliable solution for these.  I would welcome hearing from anyone who does.  Luckily the animated models I have purchased, so far, have always had a version of Collada compatible with Blender supplied with them.  I can fix the other problems with the imported files using the techniques that follow.

I have tested converting FBX files to Collada using the Autodesk FBX Converter mentioned above and the results have failed to open in Blender!

As far as I know OBJ files do not contain any animation information.  You can convert the mesh to OBJ but the armature and the animations are lost.

I cannot find a way to scale animations and keep them working!

Textures

Blender can find the textures more reliably if they are all in the same folder as the blend file.  The first job I do at the start is to find all the images from the originating folders and copy them in to whichever folder I have created the blend file in.


Some source files contain the paths used by the author on their machine.  That is not very helpful.  You can use a text editor to fix this but I find that converting the FBX file as described above usually fixes that problem at the same time.

Importing

No need for instructions for this bit.  Its just select import from the file menu, the import type, Wavefront (.obj) or Collada (.dae) and select the file.


A word of warning.  Animated models can take a very long while to load.  If Blender appears to hang, give it a chance.  For one model I had to wait nearly 5 minutes but it did load eventually.

Rotation

If you've used the importer on the model you should have it in Blender looking correct but it might still have some problems.  Most common is that lots of other 3D modelling editors use the Y axis for up but Blender uses Z for up.

When imported in to Blender an Object rotation might have been added so the model looks the correct way up.  Check what the rotation is in the Transform window.


Alternately, the model appears laying on it's back but the Object rotation is set to zero.


My preference is to end up with no rotation in Object mode and apply any rotation needed in Edit mode.   That is required if you want to use the model in XNA.

Blender has a simple function to sort this out but as is common with Blender it is lost within all the other features.  See the apply menu which pops up when you press Ctrl+A.

First get the model looking the right way up in Object mode.  If the model is laying on its back usually all that is needed is to manualy type in 90 in to the X axis field of the rotation transformation.


Once the model appears the correct way up and if it has a transformation you can apply that transformation to remove the Object mode settings and apply that to the vertices and armature. (Ctrl+A)

In Object mode select the model that needs rotating.  It the model has an armature also select that at the same time.  I usually select the mesh first then the armature.  I don't know if it makes any difference.


Make sure the cursor (or whatever point is used for rotating and scaling round) is at exactly the same point as the origin of your model. 


Move the model and the cursor to zero first or probably better still use the pivot centre that rotates and scales round the model.


With the rotation point in the correct position, from the Object menu, Apply, Rotation.

The model will stay the same but the transform settings will change to nothing.


If the model is animated, now is a good time to check that the actions still look correct. 


Scale and Location

I would also recommend removing any scale and location before you start using the model.  This is Just so you have a clean slate when you start.  It is almost essential to do this if you want to use the model with XNA.


In object mode you can just edit the fields to a scale of one and location of zero.  There are similar methods to that described for rotation to apply location and scale. 

If you want the model to stay still and just the origin move apply the location (Ctrl+A L).  I find that useful for laying out levels.  If you want the whole model to move to zero then manually edit the location.

I have had mixed results with scale but mainly because the results can be dramatically affected by the rotation point.  Make sure that you know where whatever rotation point you are using is.  That rotation point affects what the model will look like after applying the scale.  If all three scales are already the same yiou can just set them all to one and adjust the size of the model in Edit mode.


Separate The Textures

Although at this stage the model should look correct, if you were to try to manipulate it in Edit mode you would find that the UV mapping would get messed up.  For some reason unknown to me the model is imported as a single object with multiple textures.  I have no idea how to deal with a model like that in Blender.

I find the simplest solution is to split the model by its component textures before it gets muddled up.

It must be a common thing because Blender has a simple method to do this called Separate.


Select the model, go to EDIT mode and press P to separate.  From the drop down list on the popup menu select 'By Material'.  Job done.  Now you have one object per texture.  Much easier to keep the model looking as it should.


That's it.  A few steps to get there but the model is in a usable form within Blender.