I got to the stage in my coding that I needed to do more HLSL shaders. I had used Visual Studio to do the initial editing but it does not colour code HLSL fx files. I tried to add colour coding to Visual Studio but I think the free Express version does not support highlighting of other file types.
The first choice was to use NVidia FX Composer. I didn't get on with that. It looked clever with drag and drop shader creation and immediate preview but the learning curve to work out how to do a specific effect not already built in was too great. I also struggled to use some of the built in ones so I decided to revert to a normal text editor.
My editor of choice is Notepad++. Totally free, quick and you can add custom syntax highlighting.
HLSL Syntax Highlighting
I found several examples of colour coding for HLSL effect files with a quick search on the web. The trouble was none of them quite looked right to me.
The one available for download from the Notepad++ library site on sourceforge had some typing mistakes. Others had insufficient keywords or font and colour choices not to my liking. So I've created my own variant. I don't claim it to be perfect it just meets my requirements.
Lots of keywords
Similar colour choices to Visual Studio
All one font type and size
My other criterion was an additional file extension of 'fxh' as well as 'fx'. I use 'fxh' for include files which I find I use a lot when working with HLSL effect files.
Download XML
Notepad++ userDefineLang.xml for HLSL (zipped 2kb) July 2010
Installation
I may not have read the instructions properly but the only ones I found told me to copy the userDefineLang.xml file to the program folder of Notepad++.
'C:\Program Files\Notepad++'
That did not work on either of the machines I tried. Windows XP nor Windows 7. In both cases the userDefineLang.xml file had to be in the users Application Data folder. This varies between operating systems but is similar to the following:
'C:\Documents and Settings\%username%\Application Data\Notepad++'
'C:\Users\%username%\AppData\Roaming\Notepad++'
If you already have a userDefineLang.xml file for something else, you can simply add the new language to the end of the existing one in the same file. Remove the duplicated pair of <NotepadPlus> tags from the middle.
Saturday, 31 July 2010
Monday, 26 July 2010
Consistency
As I had been tinkering about with the HUD design I decided to use a similar style for the game menus.
This led me on to notice that the controls on the various menu screens were not consistent. My initial idea over a year ago had been to try to minimise the number of buttons that needed to be pressed. It sounded like a good idea but it ended up with the screens not being consistent. You had to carefully look at the controls on each menu screen before you knew what to do!
The new version works the same on every screen.
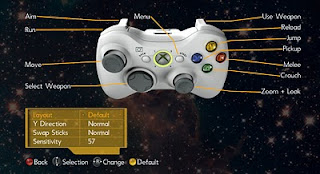
I spent the weekend going through all my menus and making them use the same controls for the same things which inevitably led back to the same way all other games work. I should have just copied everyone else in the first place. Well you live and learn.
Each option is up and down and to change each value you use left and right. B always goes back and saves if necessary.
Frustrating re-working things but I have taken the opportunity to tidy lots of things up and create some controls classes for drawing the buttons and some frames on the menus. When I create the next screen it will be so much easier.
This led me on to notice that the controls on the various menu screens were not consistent. My initial idea over a year ago had been to try to minimise the number of buttons that needed to be pressed. It sounded like a good idea but it ended up with the screens not being consistent. You had to carefully look at the controls on each menu screen before you knew what to do!
The new version works the same on every screen.

I spent the weekend going through all my menus and making them use the same controls for the same things which inevitably led back to the same way all other games work. I should have just copied everyone else in the first place. Well you live and learn.
Each option is up and down and to change each value you use left and right. B always goes back and saves if necessary.
Frustrating re-working things but I have taken the opportunity to tidy lots of things up and create some controls classes for drawing the buttons and some frames on the menus. When I create the next screen it will be so much easier.
Thursday, 15 July 2010
Collision
I've just been asked on a forum how I went about collision. As it links in to the model editor changes I made in the last post I thought I'd write up a summary.
To cut a long story short I have written three collision systems. The first two were Octrees based on a Ziggyware example. These worked nicely until I tried to get a smaller level of detail. The exponential amount of data this produced in the first version made the load time on the Xbox 360 about 7 minutes for a simple level! The second variation got down to 24 seconds load time but I still had not got the level of detail I wanted.
The final solution was grid registration. This assumes that even in a 3D scene most of the objects are positioned on a 2D plane. The world is mainly on a single level until you go inside a building.
The solution is to simply divide the world up in to a grid. Then work out where on that grid any object falls. It can fall in to several grid squares. Objects above each other would be in the same grid square.
When working out if a moving objects hits a stationary object first check the grid they are in. Then simply loop through all objects in the grid and carry out whatever collision test is needed.
My collision as previously stated is based entirely on spheres. Each object, animated, rigid, moving or static is divided up in to big spheres and then smaller spheres.
Every model and every sphere has an index and large spheres contain the index of the smaller spheres within and the smaller spheres contain the index of the triangles within.
The triangle are for use with positioning decals of bullet impacts which I won't go in to here.
Bump collision is now a simple series of loops testing each sphere in the moving object with each sphere in the static objects that are within the same grid. Working from the larger sphere to the smaller spheres. If any smaller spheres intersect then work out the overlap and use that to calculate an amount to push the spheres and therefore the models apart.
The collision of moving object against moving object does not use the grid but is fundamentally the same.
As I have a maximum of 32 moving objects at any one time in the game, I just test all 32 against each other. This is done first, so the end result is that moving objects could fractionally overlap other moving objects if they bounce off a static object but a moving object cannot end up overlapping a static object.
Monday, 12 July 2010
Model Editor
Since completing the shadow mapping I've added normal mapping to the shader and started to look at adding more models to the level.
I purchased some spaceship models from 3DRT.com which are in a style that suits the game.
To get them to work in the game I have to add collision bounds to them. In my case all the bounds in the game are based on spheres. I have a function that divides the model up in to larger and then smaller spheres.
That works well but does not care if a sphere overhangs an edge. In the case of square buildings this does not cause any noticable problems. These space ships have overhanging wings.
While testing them I kept getting stuck where I should not have got stuck. I had to write an editor for my bounds creation function so that I can remove bounding spheres that unnecessarily get in the way.
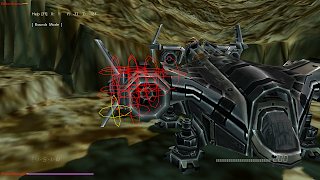
Most of the code I needed to do this was already in the game. I find this a lot now. Most of what I have to change or add is just a variation of something I've already written so the game is moving on more quickly now.
In the above picture you can see the small spheres clusterred round one part of the model. The whole model is coverred with those spheres but to make collision detection quicker those spheres are included in a larger sphere. The small group shown above are the smaller spheres in just one of the larger spheres.
Just in case its not obvious, those spheres are never visible in game. I had to deliberately add the line drawn circles to visualise them while editing. A long time ago I added a shapes class to the game that is only used by the editor to represent frustums, bounding spheres, bullet trajectories and anything else where I needed to visualise the result of some function or other. Over time I have a lot of options that I can overlay on the view.
I purchased some spaceship models from 3DRT.com which are in a style that suits the game.
To get them to work in the game I have to add collision bounds to them. In my case all the bounds in the game are based on spheres. I have a function that divides the model up in to larger and then smaller spheres.
That works well but does not care if a sphere overhangs an edge. In the case of square buildings this does not cause any noticable problems. These space ships have overhanging wings.
While testing them I kept getting stuck where I should not have got stuck. I had to write an editor for my bounds creation function so that I can remove bounding spheres that unnecessarily get in the way.

Most of the code I needed to do this was already in the game. I find this a lot now. Most of what I have to change or add is just a variation of something I've already written so the game is moving on more quickly now.
In the above picture you can see the small spheres clusterred round one part of the model. The whole model is coverred with those spheres but to make collision detection quicker those spheres are included in a larger sphere. The small group shown above are the smaller spheres in just one of the larger spheres.
Just in case its not obvious, those spheres are never visible in game. I had to deliberately add the line drawn circles to visualise them while editing. A long time ago I added a shapes class to the game that is only used by the editor to represent frustums, bounding spheres, bullet trajectories and anything else where I needed to visualise the result of some function or other. Over time I have a lot of options that I can overlay on the view.
Wednesday, 7 July 2010
Shadows
A year ago I started working on shadows for the game. I had decided that it was essential to have them but as the game is a shooter they do not have to be perfect. They have to be good enough and fast.
Before you critisise that decision take a look at some of the AAA games. The quality of shadows varies considerably. Ghost Recon has near perfect shadows but Gears Of War only has good shadows cast from the characters. Some scenery does not cast shadows at all or only casts it on other static objects! If you play either game you will be happy with the result although in Ghost Recon just occasionally you may notice that the drone high up in the sky casts a shadow on the ground.
A year ago I knew nothing about shaders. My method was to take the Creators Club shadow sample and try to join it to the Creators Club skinning sample. It took me three months to work it all out. In the process I was learning about animation and about effect shaders.
The result was not good enough but I needed to move on and get more of the game created. I knew I would return to it. That time was this week.
I now know much more about shaders. I've re-written them many times to add the terrain texturing, decals with transparency and to make use of effect pools. Effect pools were the best improvement because I use the shared prefix which means I can set the parameters just once for the entire scene rather than once per mesh! [Edit: XNA 4.0 removed effect pools! I had to add a lot of code back in!]
That also meant I now only had to edit one effect file which was shared by all of the draw calls for all objects static or animated.
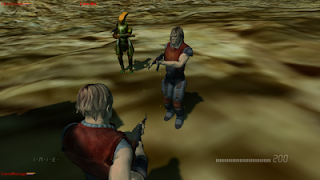
The above is the finished result which I am pleased with.
That uses Parallel Split ShadowMaps (PSSM) with edge tap smoothing Percentage Closer Filtering (PCF).
A lot of the time was tweeking the various settings to get them to all work together. The split distances have to be just right, the number of samples for the PCF has to be just right and to get any speed I have to keep the shadow map sizes to 512x512. I use 4 parallel splits but I calculate them at different frames to minimise the impact on performance.
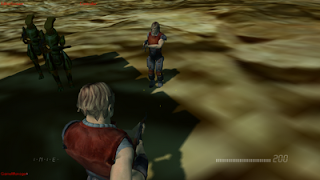
To get the shadows to overlap and cover the correct models as they move past the shadows it is necessary to draw the objects with the furthest away from the light source drawn first and then in order of the next closest and so on. That sort is done on the CPU not the GPU. The CPU on the Xbox 360 is poor compared to a PC so that sort has to be efficient.
Although the coding is all mine I can't claim the design. Many many clever people have come up with the maths formulea and put it in to code or articles. The NVidia developer site was essential reading but the final finishing touches was based on an XNA forum post. I'd like to thank everyone who has shared any shader or other code about shadows. I've probably read or looked at them all in the last year.
Before you critisise that decision take a look at some of the AAA games. The quality of shadows varies considerably. Ghost Recon has near perfect shadows but Gears Of War only has good shadows cast from the characters. Some scenery does not cast shadows at all or only casts it on other static objects! If you play either game you will be happy with the result although in Ghost Recon just occasionally you may notice that the drone high up in the sky casts a shadow on the ground.
A year ago I knew nothing about shaders. My method was to take the Creators Club shadow sample and try to join it to the Creators Club skinning sample. It took me three months to work it all out. In the process I was learning about animation and about effect shaders.
The result was not good enough but I needed to move on and get more of the game created. I knew I would return to it. That time was this week.
I now know much more about shaders. I've re-written them many times to add the terrain texturing, decals with transparency and to make use of effect pools. Effect pools were the best improvement because I use the shared prefix which means I can set the parameters just once for the entire scene rather than once per mesh! [Edit: XNA 4.0 removed effect pools! I had to add a lot of code back in!]
That also meant I now only had to edit one effect file which was shared by all of the draw calls for all objects static or animated.

The above is the finished result which I am pleased with.
That uses Parallel Split ShadowMaps (PSSM) with edge tap smoothing Percentage Closer Filtering (PCF).
A lot of the time was tweeking the various settings to get them to all work together. The split distances have to be just right, the number of samples for the PCF has to be just right and to get any speed I have to keep the shadow map sizes to 512x512. I use 4 parallel splits but I calculate them at different frames to minimise the impact on performance.

To get the shadows to overlap and cover the correct models as they move past the shadows it is necessary to draw the objects with the furthest away from the light source drawn first and then in order of the next closest and so on. That sort is done on the CPU not the GPU. The CPU on the Xbox 360 is poor compared to a PC so that sort has to be efficient.
Although the coding is all mine I can't claim the design. Many many clever people have come up with the maths formulea and put it in to code or articles. The NVidia developer site was essential reading but the final finishing touches was based on an XNA forum post. I'd like to thank everyone who has shared any shader or other code about shadows. I've probably read or looked at them all in the last year.
Subscribe to:
Posts (Atom)


