
Over the weekend and still continuing the XNA forums are down for an upgrade. Everyone suspects this is because of the Windows Phone 7 launch.
This is inconvenient and I have had to resort to Twitter for advise. Not as bad as I thought everyone was very helpful. Thanks to @mikebmcl, @UberGeekGames and others. 140 characters is a bit short to get much across but I got what I needed to know.
I had to re-write the muzzle flash code to make it easier to change the graphic. My previous code, working in XNA 3.1, produced a too harsh effect in XNA 4. I wanted it to fade out a bit more at the edges. In the process I discovered that the new XNA 4 Particle3D sample on the creators club uses the XNA 3.1 syntax for VertexDeclarations. It did not stop it working but I like to use the best methods so I re-wrote those as well.
I have three major areas left to get working properly. Shadows, which are now very rough on Windows because of the enforced HLSL instruction slot limits, 512 for PS_3_0. As the game is for the Xbox360 I am not going to worry about that until I see the results on the 360.
Animations are limited to only one per FBX file. I am also not worried about this because at worst I could export all my animations from Blender one at a time. I will most likely change the code to simply use the FBX file almost unchanged instead of my own animation format only invented in order to save the animations individually.
What I am left with to deal with are triangles... The new model class has a separate VertexBuffer for each mesh. The old one had one vertex buffer for the whole model. In theory I should find this easier to extract triangles from each model. My first quick guess did not work.
I need to reinstate my debug code that lets me view the triangles so that I know when I have got it right.
In game the collision is based on spheres but the editor uses the triangles to calculate the location of the spheres. In game the only time the individual triangles are used is to calculate the orientation of bullet impact decals so that they line up correctly with the faces of the model.
I'd better get on with it instead of typing this.
[Edit]
I did what I said and the resulting code to extract triangles can be found on the following web page:
http://www.discoverthat.co.uk/games/xna.htm#vertex
I found another similar blog giving yet more useful details on the transition from XNA 3.1 to 4.0 it covers much of the same ground as my posts but also has some example code:
http://blogs.microsoft.co.il/blogs/grozen/archive/2010/10/23/converting-a-3d-xna-3-0-game-to-xna-4-0-an-example.aspx
Monday, 11 October 2010

Wednesday, 6 October 2010
XNA 4.0 from XNA 3.1
Last night my code finally compiled in XNA 4.0. I had reached a good point last Friday and thought I had some time so I decided then was a good time to upgrade. For those reading this who are not familiar with XNA. It is the game development framework that Microsoft has provided for Indie and hobby developers. It is based on C# and is the only way for hobby programmers to release games on the Xbox 360.
XNA 4.0 is the latest version. It has some improvements but also some pain converting from the older version. In all it has taken me about 20 hours to get this far.

The unexpected problem is that the model of the space ship is showing it's insides on the outside. I'm sure I will work out how to fix it but at the moment it is a bit frustrating!
What I wanted to write here was just a list of all the things I have had to do to convert from XNA 3.1 to XNA 4.0. Partly to let off steam and hopefully to help some other people doing the same. I've included some useful links as well.
- The conversion to XNA 4.0 did not get all the references right.
I had to manually remove them and re-add them. This cannot be done from within the IDE it was necessary to edit the project file with a text editor. Very quick and painless.
Remove and re-add References. Most can be added back using Visual Studio but a couple have to be manually edited:
mscorlib (can not add back with VS edit .csproj file)
System
System.Core (can not add back with VS edit .csproj file)
System.Xma
System.Xml.Linq

To add back missing items see the following post:
http://social.msdn.microsoft.com/Forums/en/windowsphone7series/thread/07af6fac-7b07-4dca-b9de-7e18c01d5f0b
The .csproj file needs to be edited manually using a text editor. Remember to close Visual Studio first.
The following image shows the syntax for the .csproj file:

I have not, as yet, changed the graphics to match. Hence the mess in the above picture.
http://blogs.msdn.com/b/shawnhar/archive/2010/04/08/premultiplied-alpha-in-xna-game-studio-4-0.aspx
Changed new Color(colour, alphaByte) [0 to 255] to colour * alphaFloat [0.0 to 1.0]
- Several changes to the shader effect files
AdderssU and V only support: Wrap, Clamp and Mirror.
Border and BorderColor are gone.
http://blogs.msdn.com/b/shawnhar/archive/2010/04/02/state-objects-in-xna-game-studio-4-0.aspx
Set all the Mip, Mag and Min filters on the shadowmaps to Point. Not sure why but unless I do that I get an exception when running the game.
The new effect shader compiler is also much fussier on Windows. It enforces the minimum number of instruction slots for each shader model, e.g. PS 3 can have a minimum of 512 instruction slots. My graphics card could have more but the compiler does not let me use them. The Xbox 360 compiler is virtually unchanged and so my old shader code compiled for the Xbox but not for Windows. I've had to reduce the quality of the shadows on Windows to fit within the 512 limit in one pass. I've added a compiler directive #if defined(XBOX360) so I can do that.
- Re-wrote the way the sky is drawn. The new Creators Club sample no longer uses a separate effect file.
http://creators.xna.com/en-GB/sample/generatedgeometry
[Edit: had to re-instate the old version because the new one did not work with my terrain!]
- Changed the exception in the Skinned model prosessor to a warning about not having any animations.
My models already have separate animations so the skinned models need to be loaded even though they do not have any animations included with them.
- I have temporarily removed my built in screen shot class. Resolve back buffer has been removed and it is now necessary to use a RenderTarget to get the screenshot. As this puts unnecessary code in to my draw loop I have not done it yet.
The screenshots are only for my benefit and they were not going to be in the finished game so it's no loss.
http://blogs.msdn.com/b/shawnhar/archive/2010/03/30/resolvebackbuffer-and-resolvetexture2d-in-xna-game-studio-4-0.aspx
http://blogs.msdn.com/b/shawnhar/archive/2010/03/26/rendertarget-changes-in-xna-game-studio-4-0.aspx
http://forums.xna.com/forums/t/55428.aspx
- Removed all Depth Stencil buffers and added back the type in the RenderTarget2D where necessary.
Reading about this was more confusing than just doing it. The new XNA 4.0 method is much easier.
http://blogs.msdn.com/b/shawnhar/archive/2010/03/16/breaking-changes-in-xna-game-studio-4-0.aspx
http://www.innovativegames.net/blog/blog/2010/07/13/xna-4-0-breaking-changes-rendertargets/
http://blogs.msdn.com/b/shawnhar/archive/2010/03/26/rendertarget-changes-in-xna-game-studio-4-0.aspx
- VertexDeclarations are also no longer needed.
http://blogs.msdn.com/b/shawnhar/archive/2010/04/19/vertex-data-in-xna-game-studio-4-0.aspx
All you need is: graphicsDevice.SetVertexBuffer(vertexBuffer);
Lots of lines deleted.
- The syntax for drawing user primitives has been simplified
Most of my code now just reads something similar to the following, instead of all the Begin() and End() methods, just:
basicEffect.CurrentTechnique.Passes[0].Apply();
http://www.bit-101.com/blog/?p=2832
- Replaced my particle system with a version based on the new sample because the old sample was based on point sprites which are no longer supported.
http://creators.xna.com/en-GB/tutorial/particlexml
Fairly easy change but as yet untested.
[Edit: needed further work to get it working nicely.]
- Changed every SpriteBlendMode.AlphaBlend to BlendState.AlphaBlend.
There were a lot of them in my code but easy to find and replace.
- On one page I used a Scissor test and the syntax has change to use RasterizerState.ScissorTestEnabled
- The Texture load and save functions have been improved.
I have changed all my BMP files to now use PNG.
http://blogs.msdn.com/b/shawnhar/archive/2010/05/10/image-codecs-in-xna-game-studio-4-0.aspx
[Edit: this saved as pre-multipled alpha which was not what I needed so I have had to change one file format.]
- Lots of changes on the storage side of things.
There is no TitleLocation anymore.
I have had to use the Manifest example for some lists:
http://creators.xna.com/en-GB/sample/contentmanifestextensions
I have changed how the StorageContainer is accessed for saving user files:
http://blogs.msdn.com/b/nicgrave/archive/2010/07/23/storage-in-xna-game-studio-4-0.aspx
For my editor I have used .NET System.IO file methods and a semi hard coded path to the same place as the user storage location in Windows. This is because the Path attribute from the StorageContainer has been removed.
I could have used any location for the editor but that one keeps everything in one known place.
A useful method is:
System.Environment.GetFolderPath(Environment.SpecialFolder.MyDocuments)
- The syntax for turning on Antialising has changed or at least the method I was using has gone. The method I now use is:
graphicsDevice.PreferMultiSampling = true;
[Edit: this needed a lot more work see the future post.]
That's what I have done so far. The game works but looks awful so I still have lots more work to do to get back to where I was with the older version a week ago!
[Edit: After I did my conversion I found better tutorials: http://www.nelxon.com/blog/xna-3-1-to-xna-4-0-cheatsheet/ ]
Tuesday, 5 October 2010
Get the triangles at run time from a model
The following is based on various other code and was produced with assistance from the XNA forums.
Download Source Code
Vertex Helper XNA 4.0 class (3kb) Oct. 2010
The following reads the vertex buffer of each model mesh part and stores the triangles in a vertex and index array.
A version of the above working in XNA 3.1 is available from: enchantedage.com
Download Source Code
Vertex Helper XNA 4.0 class (3kb) Oct. 2010
The following reads the vertex buffer of each model mesh part and stores the triangles in a vertex and index array.
public class VertexHelper
{
 public VertexHelper()
 {
 }

 public struct TriangleVertexIndices
 {
  public int A;
  public int B;
  public int C;
 }

 ///
 /// Extract the vertices and indices from the specified model
 ///
 /// Output the list of vertices
 /// Output the list of indices
 /// The models world position or use Matrix.Identity for object space
 public static void ExtractTrianglesFrom(Model modelToUse, List vertices, List indices, Matrix worldPosition)
 {
  Matrix transform = Matrix.Identity;
  foreach (ModelMesh mesh in modelToUse.Meshes)
  {
   // If the model has bones the vertices have to be transformed by the bone position
   transform = Matrix.Multiply(GetAbsoluteTransform(mesh.ParentBone), worldPosition);
   ExtractModelMeshData(mesh, ref transform, vertices, indices);
  }
 }

 ///
 /// Transform by a bone position or Identity if no bone is supplied
 ///
 public static Matrix GetAbsoluteTransform(ModelBone bone)
 {
  if (bone == null)
  {
   return Matrix.Identity;
  }
  return bone.Transform * GetAbsoluteTransform(bone.Parent);
 }

 ///
 /// Get all the triangles from all mesh parts
 ///
 public static void ExtractModelMeshData(ModelMesh mesh, ref Matrix transform,
  List vertices, List indices)
 {
  foreach (ModelMeshPart meshPart in mesh.MeshParts)
  {
   ExtractModelMeshPartData(meshPart, ref transform, vertices, indices);
  }
 }

 ///
 /// Get all the triangles from each mesh part (Changed for XNA 4)
 ///
 public static void ExtractModelMeshPartData(ModelMeshPart meshPart, ref Matrix transform,
  List vertices, List indices)
 {
  // Before we add any more where are we starting from
  int offset = vertices.Count;

  // == Vertices (Changed for XNA 4.0)

  // Read the format of the vertex buffer
  VertexDeclaration declaration = meshPart.VertexBuffer.VertexDeclaration;
  VertexElement[] vertexElements = declaration.GetVertexElements();
  // Find the element that holds the position
  VertexElement vertexPosition = new VertexElement();
  foreach (VertexElement vert in vertexElements)
  {
   if (vert.VertexElementUsage == VertexElementUsage.Position &&
    vert.VertexElementFormat == VertexElementFormat.Vector3)
   {
    vertexPosition = vert;
    // There should only be one
    break;
   }
  }
  // Check the position element found is valid
  if (vertexPosition == null ||
   vertexPosition.VertexElementUsage != VertexElementUsage.Position ||
   vertexPosition.VertexElementFormat != VertexElementFormat.Vector3)
  {
   throw new Exception("Model uses unsupported vertex format!");
  }
  // This where we store the vertices until transformed
  Vector3[] allVertex = new Vector3[meshPart.NumVertices];
  // Read the vertices from the buffer in to the array
  meshPart.VertexBuffer.GetData(
   meshPart.VertexOffset * declaration.VertexStride + vertexPosition.Offset,
   allVertex,
   0,
   meshPart.NumVertices,
   declaration.VertexStride);
  // Transform them based on the relative bone location and the world if provided
  for (int i = 0; i != allVertex.Length; ++i)
  {
   Vector3.Transform(ref allVertex[i], ref transform, out allVertex[i]);
  }
  // Store the transformed vertices with those from all the other meshes in this model
  vertices.AddRange(allVertex);

  // == Indices (Changed for XNA 4)

  // Find out which vertices make up which triangles
  if (meshPart.IndexBuffer.IndexElementSize != IndexElementSize.SixteenBits)
  {
   // This could probably be handled by using int in place of short but is unnecessary
   throw new Exception("Model uses 32-bit indices, which are not supported.");
  }
  // Each primitive is a triangle
  short[] indexElements = new short[meshPart.PrimitiveCount * 3];
  meshPart.IndexBuffer.GetData(
   meshPart.StartIndex * 2,
   indexElements,
   0,
   meshPart.PrimitiveCount * 3);
  // Each TriangleVertexIndices holds the three indexes to each vertex that makes up a triangle
  TriangleVertexIndices[] tvi = new TriangleVertexIndices[meshPart.PrimitiveCount];
  for (int i = 0; i != tvi.Length; ++i)
  {
   // The offset is because we are storing them all in the one array and the
   // vertices were added to the end of the array.
   tvi[i].A = indexElements[i * 3 + 0] + offset;
   tvi[i].B = indexElements[i * 3 + 1] + offset;
   tvi[i].C = indexElements[i * 3 + 2] + offset;
  }
  // Store our triangles
  indices.AddRange(tvi);
 }


}
A version of the above working in XNA 3.1 is available from: enchantedage.com
Sunday, 26 September 2010
Radar
I took a break from preparing my character for animation to do a bit of coding. One of the many small tasks on my list of things to do.
I've added the radar which works along side the compass.
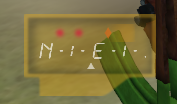
It has all the features you would expect including colour coding for friend or foe and markers for your mission goal. The dots vary in size depending on how far away the other character is.
It took a bit longer than expected to code. Mainly just tweeking to get it to look the way I wanted. I did have a rooky mistake that wasted an evening. At one point everything was always at the same point and no matter what I did it stayed there. Turned out I had cast the result of some floating point maths to an integer!
I've added the radar which works along side the compass.

It has all the features you would expect including colour coding for friend or foe and markers for your mission goal. The dots vary in size depending on how far away the other character is.
It took a bit longer than expected to code. Mainly just tweeking to get it to look the way I wanted. I did have a rooky mistake that wasted an evening. At one point everything was always at the same point and no matter what I did it stayed there. Turned out I had cast the result of some floating point maths to an integer!
Sunday, 12 September 2010
Animations
I hadn't posted for a while so I thought I'd give a quick update.
I have the first of my player characters ready to animate. To get from the stage of receiving the model from the artist to being ready to animate has taken two weekends with lots of 3D editing and I also decided that before I animate this model I would tidy up some of the game code that is used to move the models.
I've changed the importer to rotate the model for me rather than applying a matrix rotation every frame. I've also changed the way weapons are held.
Back to the animations. My plan is that all of the same type of model will use the same animation keyframes. This means that each model file is smaller because the animations are stored separately.
The disadvantage is that every model has to start off in the same pose and have the same armature. The armature is the skeleton used to animate an organic model. It is also referred to as a rig.
During development I have changed things that affect the skeleton several times or at least changed what I need from the rig. This time I have added an extra bone for the weapon to attach to. Previously I had attached the model directly to the hand but although this worked it made it very difficult to line up which way the weapon was facing with the position of the hands holding that weapon.
This is the skeleton and the bind pose I have settled on.
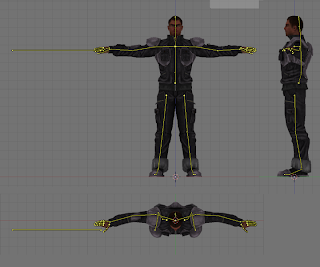
This will be the third time I have done the animations and I would like it to be the final one. I am not an animator. I have had to learn animation almost from scratch so it takes me a long time to get it right.
I have the first of my player characters ready to animate. To get from the stage of receiving the model from the artist to being ready to animate has taken two weekends with lots of 3D editing and I also decided that before I animate this model I would tidy up some of the game code that is used to move the models.
I've changed the importer to rotate the model for me rather than applying a matrix rotation every frame. I've also changed the way weapons are held.
Back to the animations. My plan is that all of the same type of model will use the same animation keyframes. This means that each model file is smaller because the animations are stored separately.
The disadvantage is that every model has to start off in the same pose and have the same armature. The armature is the skeleton used to animate an organic model. It is also referred to as a rig.
During development I have changed things that affect the skeleton several times or at least changed what I need from the rig. This time I have added an extra bone for the weapon to attach to. Previously I had attached the model directly to the hand but although this worked it made it very difficult to line up which way the weapon was facing with the position of the hands holding that weapon.
This is the skeleton and the bind pose I have settled on.

This will be the third time I have done the animations and I would like it to be the final one. I am not an animator. I have had to learn animation almost from scratch so it takes me a long time to get it right.
Saturday, 14 August 2010
Windows vs Xbox360
I do most of my development and testing on Windows. It's a much quicker cycle from code to test to code again. From time to time I have to test on the Xbox360 to make sure it all runs.
Whenever I test on the 360 there are always differences. The number of times I have seen a code 4 error! This time it was very unexpected because it was type casting.
I had tidied up my storage code. I had lots of the same loading and saving code where the only difference was the class of file it was working with. I did the obvious and converted it to a generic function using the base 'object' class and type cast to the type I needed.
This all worked perfectly first time on Windows. Not at all on the Xbox360. Turns out that no matter how I try I cannot return a value when I cast it back from the 'object' class. On the Xbox360 it always returns null.
I re-wrote the code so I didn't have to return a value. I keep the generic 'object' in the one method and have a set of if statements to store the results in the correct type. Not as neat but it works.
While on the subject of peculiarities and storage the Guide function on the 360 can be misleading. Sometimes it returns busy when it is not or perhaps it was a moment ago but it's not now! I have had to add several automatic retry loops in my code to avoid that problem.
Whenever I test on the 360 there are always differences. The number of times I have seen a code 4 error! This time it was very unexpected because it was type casting.
I had tidied up my storage code. I had lots of the same loading and saving code where the only difference was the class of file it was working with. I did the obvious and converted it to a generic function using the base 'object' class and type cast to the type I needed.
This all worked perfectly first time on Windows. Not at all on the Xbox360. Turns out that no matter how I try I cannot return a value when I cast it back from the 'object' class. On the Xbox360 it always returns null.
I re-wrote the code so I didn't have to return a value. I keep the generic 'object' in the one method and have a set of if statements to store the results in the correct type. Not as neat but it works.
While on the subject of peculiarities and storage the Guide function on the 360 can be misleading. Sometimes it returns busy when it is not or perhaps it was a moment ago but it's not now! I have had to add several automatic retry loops in my code to avoid that problem.
Friday, 6 August 2010
Menus
Once I started I couldn't finish.
Following on from making the menu controls more consistent I deviated on to making the menus look better. I already had a fully working and complete menu system but it needed something.
For the last few weeks I've been working on the graphics for the menu screens. I am just about finished now.
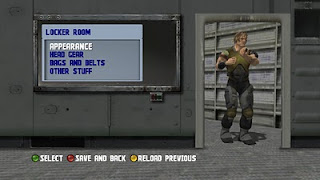
My original plan had always been to have a menu system that felt like you were already in the game. I had put that idea aside because of the extra work on top of the game to get that working. That is what I have now done.
Plenty of other games have similar interfaces and I am pleased with my implementation. Each menu screen looks like the view inside a space ship. Not the shiniest of crafts but a more utilitarian vessel.
Following on from making the menu controls more consistent I deviated on to making the menus look better. I already had a fully working and complete menu system but it needed something.
For the last few weeks I've been working on the graphics for the menu screens. I am just about finished now.

My original plan had always been to have a menu system that felt like you were already in the game. I had put that idea aside because of the extra work on top of the game to get that working. That is what I have now done.
Plenty of other games have similar interfaces and I am pleased with my implementation. Each menu screen looks like the view inside a space ship. Not the shiniest of crafts but a more utilitarian vessel.
Subscribe to:
Posts (Atom)





 Posts
Posts


